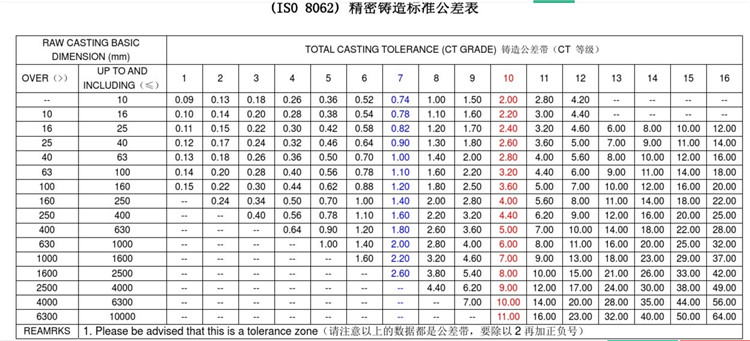
In the production and processing, we should use the forging process to replace the casting process for the parts required by the blank surface.Now let's compare them in terms of tolerances.CT10 for forgings was compared with CT7 for castings.
First look at the investment casting tolerance table.

Forging is not marked with tolerance standard
I. Reference standards
GB12361 general technical conditions for steel die forging
GB12362 steel die forging tolerance and machining allowance
Limit deviation of unmarked tolerance dimension of QC/T270 automotive die forging parts
1. Take customer requirements as the principle. In case of any conflict with customer requirements, customer requirements shall prevail.
2. In accordance with the principle of drawings and process documents, if the drawings or process documents have been indicated, the documents shall prevail.
The above principles shall not be violated in the use of this standard.
Iii. Scope of use
It is applicable to control the tolerance of forging pieces without injection in the forging factory.
Iv. Specific content
No dimension tolerance is noted for forging holes

2. No dimensional tolerance is noted for forging shafts

3. Forging non-hole shaft without dimension tolerance

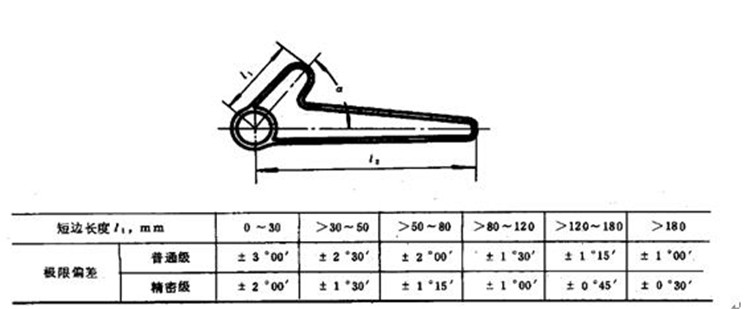
4, Angle tolerance, refer to the table below common level implementation

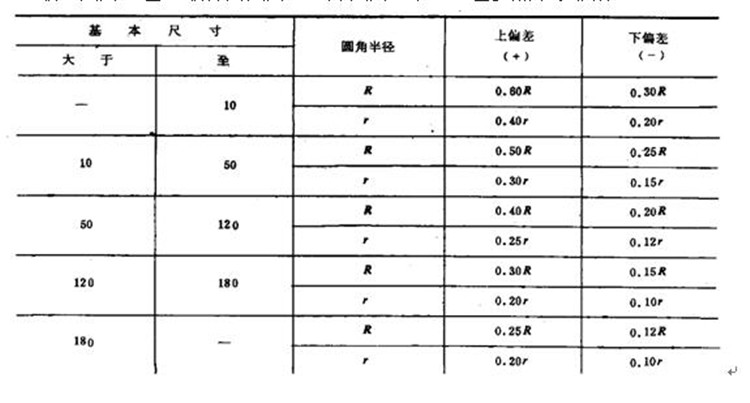
5. Forging roundness tolerance: please refer to the table below for the unmarked tolerance of forging inner roundness R and outer roundness R

6. The tolerance of straightness and flatness of forgings shall refer to the following table, but shall not be greater than 2/3 of the machining allowance

7. The cutting depth (meat cutting) is the same as the location of defects indicated by residual flanges and burrs; on the contrary, the tolerance value is the same.The front axle class shall be 1.5, and the small forgings class shall refer to the drawing requirements.
8. Concave and convex marks of the front axle jacking rod shall not be greater than 1.0.
9. Surface defect depth tolerance: surface defect refers to the actual depth of pits, pitting, bruising, folding and cracks on the surface of forgings, which is implemented as follows:
Machining surface: if the actual size of forgings is equal to the basic size, the depth is half of the unilateral machining allowance; if the actual size is greater than or less than the basic size, the depth is half of the unilateral machining allowance plus or minus the actual deviation value of the unilateral, and the internal surface size is the opposite value.
Non-machined surface: the depth tolerance is 1/3 of the thickness tolerance.

Copyright © Tianhui Machinery Co.,Ltd All Rights Reserved Website Map XML